Cheesy Bombs
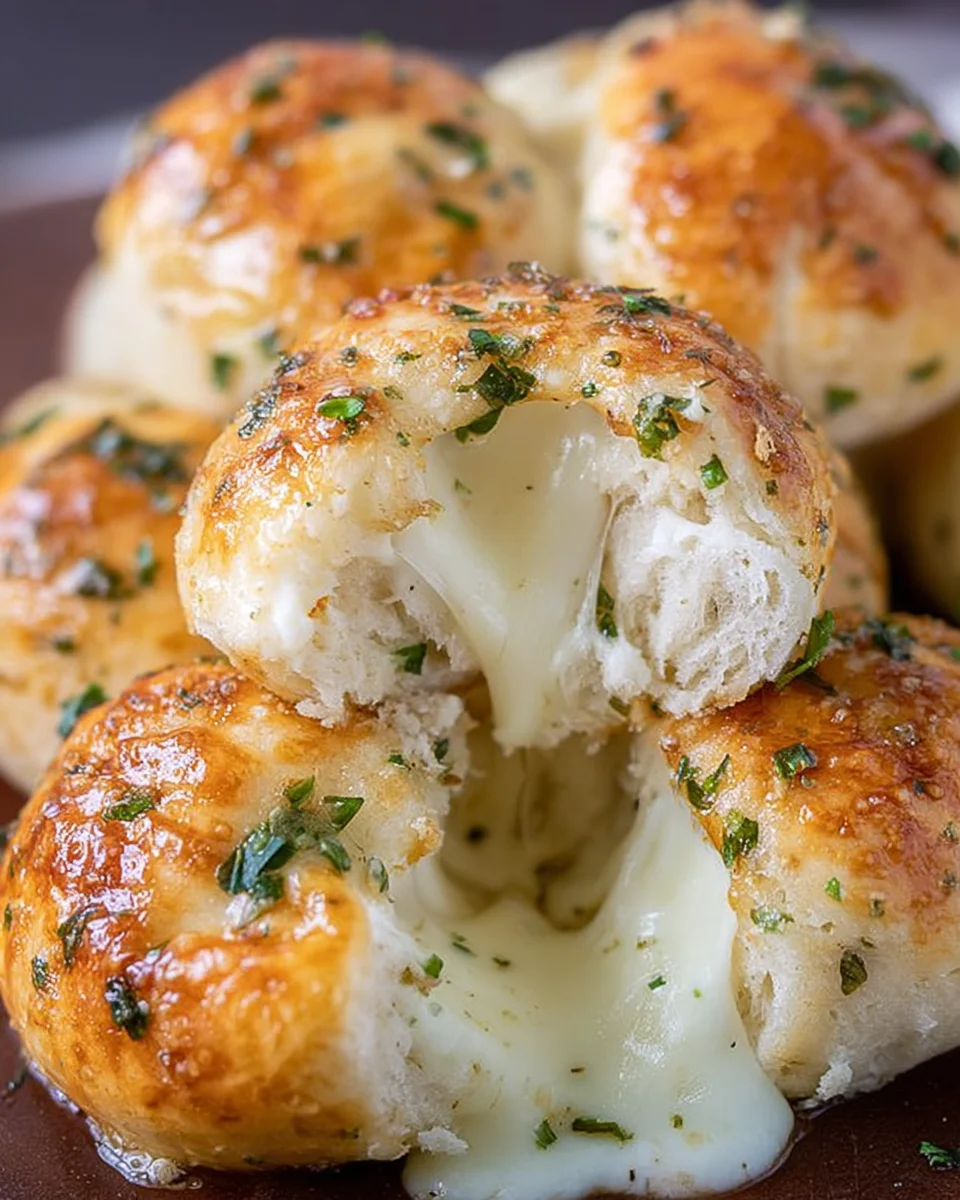
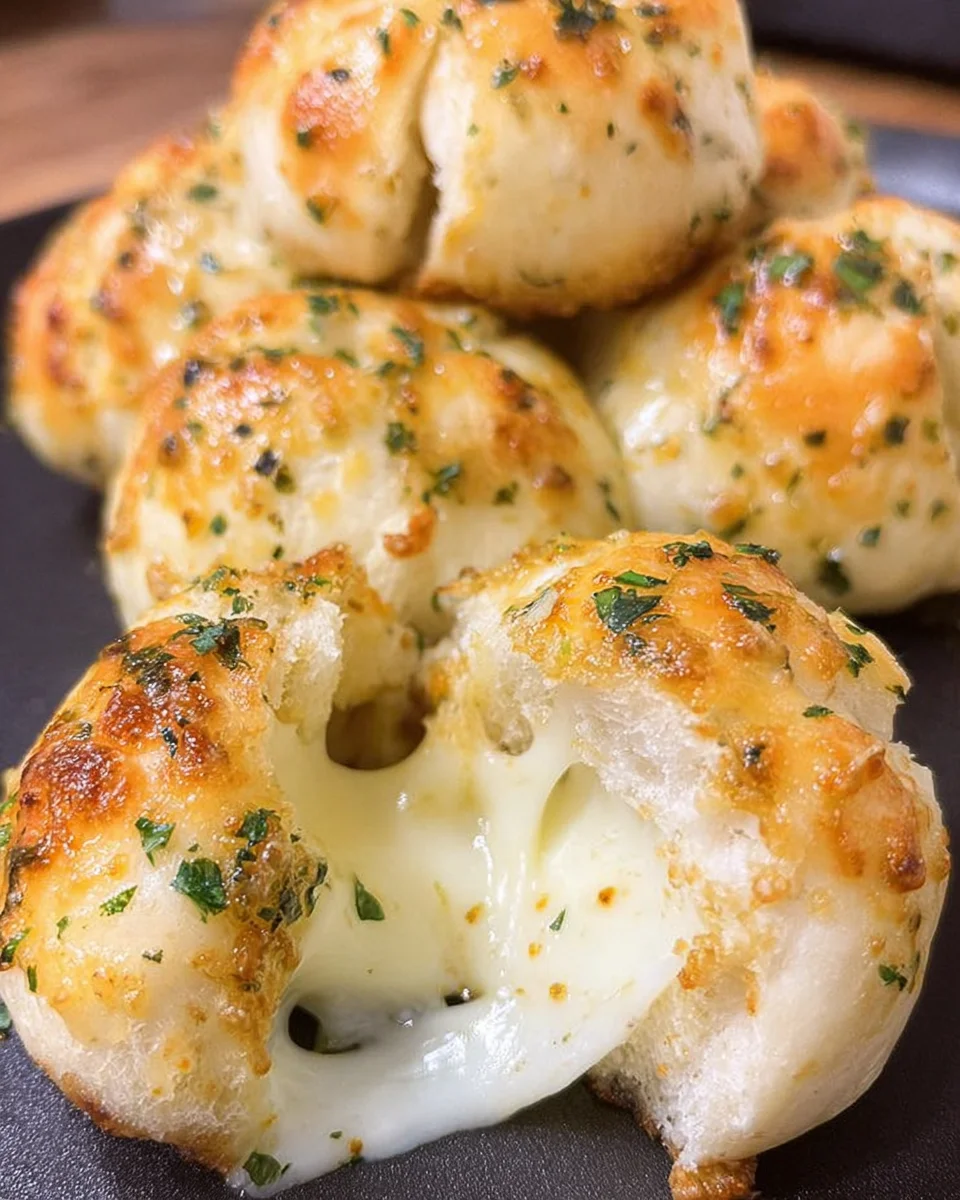
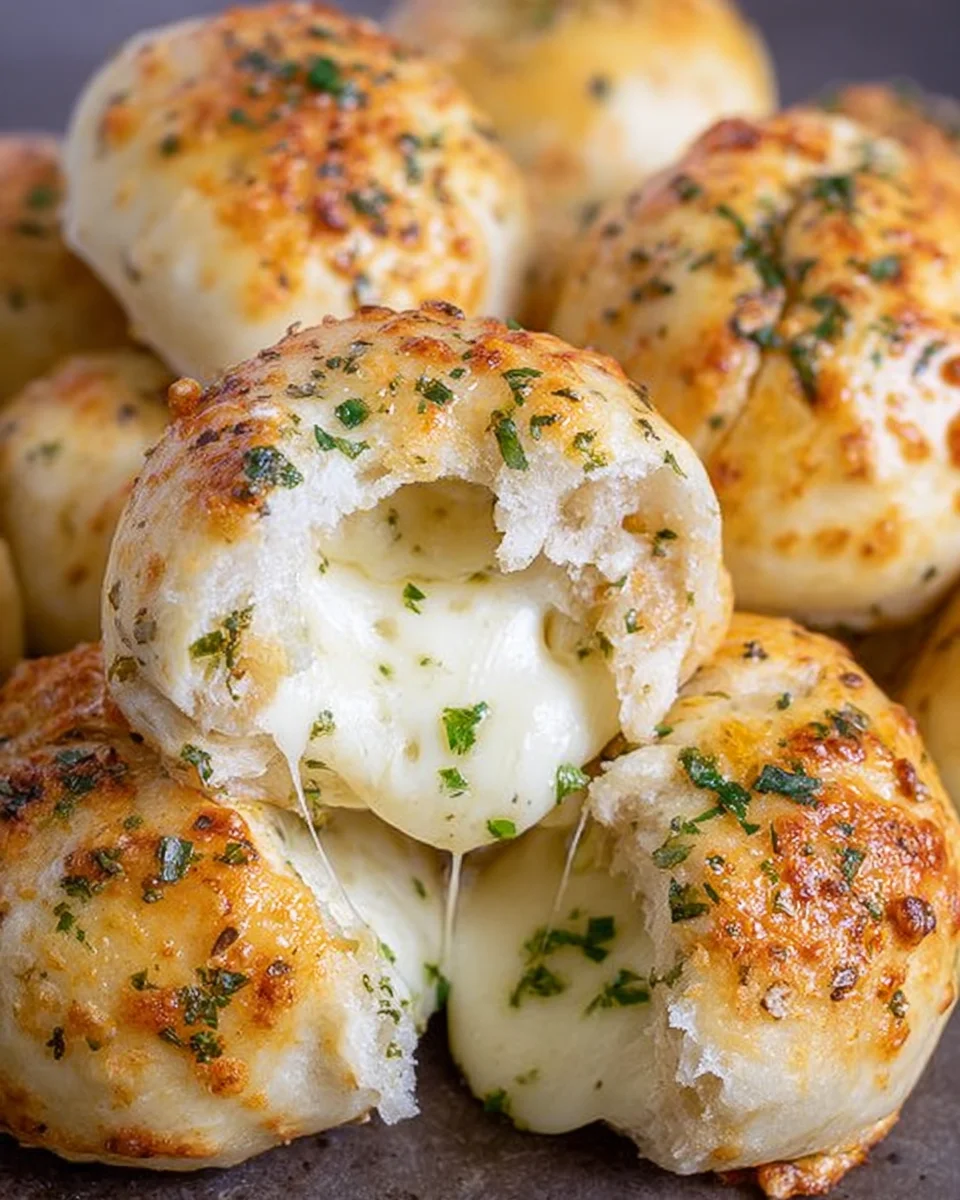
Cheesy Bombs are the ultimate treat for cheese lovers! These delightful bites are stuffed with gooey mozzarella and brushed with a rich garlic butter, making them perfect for any occasion. Whether you’re hosting a party, looking for a fun snack, or planning a cozy brunch, these Cheesy Garlic Bombs will impress your guests and satisfy your cravings. Their easy preparation and amazing flavor set them apart as a must-try recipe.
Why You’ll Love This Recipe
- Easy to Make: With simple steps and minimal ingredients, you can whip up these cheesy treats in no time.
- Perfect for Sharing: These bombs are great as appetizers at parties or as a snack for family game nights.
- Gooey Goodness: Each bite delivers a burst of melted mozzarella cheese that everyone will love.
- Versatile Flavor: The combination of garlic butter and parsley adds an irresistible flavor that pairs well with various dishes.
- Customizable: Feel free to add herbs or spices to the filling for a unique twist.
Tools and Preparation
Having the right tools makes preparing Cheesy Bombs easier and more efficient. Here’s what you’ll need to get started:
Grab This Chef Knife Now - Almost Gone!
- Stays Razor-Sharp: Ice-hardened blade keeps its edge longer than ordinary knives
- Superior Grip Control: Unique finger hole design gives you perfect balance and safety
- Built to Last a Lifetime: Premium stainless steel blade with elegant beech wood handle
Customer Reviews ★★★★★
Essential Tools and Equipment
- Baking sheet
- Parchment paper
- Mixing bowl
- Microwave-safe dish or saucepan
- Plastic wrap
Importance of Each Tool
- Baking sheet: Provides an even surface for baking your cheesy bombs, ensuring they cook uniformly.
- Parchment paper: Prevents sticking and makes cleanup a breeze after baking.
- Mixing bowl: Essential for combining ingredients like melted butter and garlic.
Ingredients
These Cheesy Garlic Bombs are stuffed with mozzarella cheese and brushed with a rich garlic butter. Easy to make and perfect as a snack or appetizer.
For the Dough
- 8 frozen Texas rolls (thawed, Rhodes brand recommended)
For the Filling
- 4 sticks mozzarella cheese, cut into 16 pieces
For the Garlic Butter
- 4 tablespoons salted butter, melted
- 2 cloves garlic, minced
- 1 tablespoon parsley flakes (freshly chopped or dried)
How to Make Cheesy Bombs
Step 1: Prepare the Rolls
- Place the frozen rolls on a plate, cover with plastic wrap, and refrigerate for at least 4 hours or overnight.
Step 2: Preheat the Oven
- Preheat your oven to 350°F.
- Line a baking sheet with parchment paper.
Step 3: Cut the Cheese
- Cut the mozzarella sticks into approximately 1-inch pieces.
Step 4: Flatten the Dough
- Using your hands, flatten each dough ball into a round disk.
Step 5: Add Cheese Filling
- Place two pieces of cheese in the center of each flattened dough disk.
Step 6: Seal the Dough Balls
- Pinch the edges firmly together to seal in the cheese.
- Place the sealed dough balls seam side down on the baking sheet.
Step 7: Bake
- Bake the rolls for 9-11 minutes, or until they start to brown.
Step 8: Prepare Garlic Butter Mixture
- While the rolls are baking, melt the butter in a microwave-safe dish or saucepan.
- Stir in the minced garlic and parsley flakes once the butter is melted.
Step 9: Brush with Garlic Butter
- After removing the rolls from the oven, brush each one evenly with the garlic butter mixture.
Step 10: Serve
- Allow the cheesy garlic bombs to cool slightly before serving.
Enjoy these delicious Cheesy Bombs at your next gathering!
How to Serve Cheesy Bombs
Cheesy Bombs are versatile and can be served in various delightful ways. Whether as an appetizer or a snack, these cheesy bites will impress your guests and family alike.
With Dipping Sauces
- Marinara Sauce – A classic pairing, marinara adds a rich tomato flavor that complements the cheese.
- Ranch Dressing – Creamy ranch offers a cool contrast to the warm cheesy bombs.
- Garlic Aioli – This garlicky dip enhances the buttery flavors of the bombs.
As Part of a Charcuterie Board
- Cheese Platter – Include various cheeses alongside your cheesy bombs for a delightful mix.
- Cured Meats – Salami or prosciutto pairs well with the richness of the cheese.
- Olives and Pickles – These add a tangy crunch that balances the creamy texture of the bombs.
With Fresh Salads
- Caesar Salad – The crispness of romaine lettuce and creamy dressing works well with cheesy bombs.
- Caprese Salad – Fresh tomatoes and mozzarella can complement the flavors beautifully.
- Greek Salad – The freshness of cucumbers and olives brightens up the meal.
As a Solo Snack
- Enjoy them straight from the oven while they’re still warm for an irresistible treat!
How to Perfect Cheesy Bombs
To ensure your Cheesy Bombs turn out perfectly every time, follow these helpful tips.
- Use Fresh Ingredients – Fresh garlic and herbs elevate the flavor profile significantly.
- Don’t Overstuff – Ensure you don’t pack too much cheese inside each dough ball, or they may burst during baking.
- Seal Well – Pinch edges tightly to keep all that gooey cheese inside while baking.
- Brush Generously with Butter – A good coating of garlic butter enhances flavor and gives a beautiful golden color.
- Experiment with Cheese Varieties – Try different types of cheese like cheddar or pepper jack for unique flavors.
Best Side Dishes for Cheesy Bombs
Cheesy Bombs pair excellently with various side dishes. Here are some great options to enhance your meal experience:
- Garlic Bread – This classic side complements the cheesy flavors wonderfully and is easy to prepare.
- Stuffed Mushrooms – These bite-sized treats filled with cheese or sausage make for a delicious pairing.
- Bruschetta – Fresh tomatoes on toasted bread add brightness and acidity to balance out richness.
- Vegetable Platter – Keep it light with fresh veggies served alongside dips for contrast.
- French Fries – Crispy fries add texture and heartiness to your platter.
- Potato Wedges – Seasoned wedges are perfect for dipping into sauces alongside your cheesy bombs.
Common Mistakes to Avoid
There are a few common mistakes that can affect the outcome of your Cheesy Bombs. Here’s how to avoid them for the best results.
- Using frozen rolls without thawing: Always ensure that the Texas rolls are properly thawed before starting the recipe. This allows them to rise and bake evenly.
- Overstuffing with cheese: While it might be tempting to add more cheese, overstuffing can cause the bombs to burst open during baking. Stick to two pieces of mozzarella for perfect results.
- Not sealing properly: Sealing the edges of each dough ball is crucial. If they aren’t sealed well, the cheese will leak out while baking. Pinch firmly to ensure a tight seal.
- Skipping the garlic butter: The garlic butter adds flavor and richness to the Cheesy Bombs. Don’t skip this step; brush it generously after baking for maximum flavor.
- Baking at the wrong temperature: Always preheat your oven to 350°F before baking. This ensures even cooking and helps achieve a golden brown finish.
Storage & Reheating Instructions
Refrigerator Storage
- Store any leftover Cheesy Bombs in an airtight container in the refrigerator.
- They can last up to 3 days when stored properly.
Freezing Cheesy Bombs
- For longer storage, freeze unbaked Cheesy Bombs before brushing with garlic butter.
- Place them in a freezer-safe bag or container and they will last up to 2 months.
Reheating Cheesy Bombs
- Oven: Preheat your oven to 350°F and reheat for about 10 minutes until warm.
- Microwave: Heat on medium power for about 30-60 seconds. Be cautious as this may make them chewy.
- Stovetop: Heat in a skillet on low heat for a few minutes, covered, to keep them moist.
Frequently Asked Questions
Here are some frequently asked questions about making Cheesy Bombs.
Can I use different types of cheese for Cheesy Bombs?
Yes! You can experiment with various cheeses like cheddar or pepper jack for different flavors.
How do I make Cheesy Garlic Bombs ahead of time?
You can prepare the dough balls and fill them with cheese, then refrigerate or freeze until you’re ready to bake.
Are these Cheesy Bombs suitable for parties?
Absolutely! These cheesy treats are perfect as appetizers or snacks at any gathering.
What other seasonings can I add?
Feel free to add herbs like oregano or spices like red pepper flakes for extra flavor!
Final Thoughts
These Cheesy Bombs are not only easy to make but also incredibly delicious and versatile. You can customize them with different cheeses and spices according to your taste preferences. Whether you’re serving them as a snack or an appetizer, they’re sure to please everyone. Give this recipe a try—you won’t be disappointed!
Cheesy Bombs
- Total Time: 25 minutes
- Yield: Makes approximately 8 servings 1x
Description
Cheesy Bombs are the ultimate indulgence for cheese aficionados! These delightful bites are filled with ooey-gooey mozzarella and brushed with a luscious garlic butter, making them an irresistible choice for any gathering. Whether you’re hosting a lively party, enjoying a movie night at home, or planning a cozy brunch, these cheesy treats will wow your guests and satisfy your cravings. With their easy preparation and incredible flavor, Cheesy Bombs stand out as a must-try recipe that everyone will love.
Ingredients
- 8 frozen Texas rolls (thawed)
- 4 sticks mozzarella cheese (cut into pieces)
- 4 tablespoons salted butter (melted)
- 2 cloves garlic (minced)
- 1 tablespoon parsley flakes
Instructions
- Thaw the frozen rolls in the refrigerator for at least 4 hours or overnight.
- Preheat your oven to 350°F and line a baking sheet with parchment paper.
- Flatten each dough ball into a round disk.
- Place two pieces of mozzarella in the center of each disk and seal tightly.
- Bake for 9-11 minutes until golden brown.
- Meanwhile, melt the butter and mix in garlic and parsley.
- Brush the baked bombs with the garlic butter and serve warm.
- Prep Time: 15 minutes
- Cook Time: 10 minutes
- Category: Appetizers
- Method: Baking
- Cuisine: American
Nutrition
- Serving Size: 1 Cheesy Bomb (50g)
- Calories: 150
- Sugar: 1g
- Sodium: 320mg
- Fat: 9g
- Saturated Fat: 5g
- Unsaturated Fat: 3g
- Trans Fat: 0g
- Carbohydrates: 13g
- Fiber: 0g
- Protein: 5g
- Cholesterol: 20mg

